Maximize your email marketing potential: Learn how to use GetResponse effectively with our step-by-step guide. Boost engagement and drive results now. Discover the secrets to elevating your email marketing strategy with our in-depth guide on “How to Use GetResponse for Effective Email Marketing.” This comprehensive tutorial is designed to walk you through every step of the process, from the initial setup and list building to crafting impactful emails and automating your campaigns for optimal engagement. Whether you’re new to email marketing or seeking to refine your existing efforts, our step-by-step approach will unlock the full potential of GetResponse, enabling you to connect with your audience in the most effective way possible. Dive into the world of advanced email marketing techniques and transform your digital communication strategy today.In the digital age, mastering the art of email marketing is crucial for businesses looking to connect with their audience and drive results. “How to Use GetResponse for Effective Email Marketing: A Step-by-Step Guide” serves as your comprehensive roadmap to leveraging one of the most powerful tools in the industry. GetResponse, renowned for its robust features and intuitive design, offers marketers the capability to craft, automate, and optimize email campaigns like never before. Whether you’re a novice email marketer or looking to enhance your existing strategies, this guide provides the insights and practical steps needed to unlock the full potential of your email marketing efforts. Dive in as we explore the essentials of building your email list, designing compelling emails, automating your campaigns, and much more, ensuring you’re equipped to captivate your audience and achieve your marketing objectives.
Table of Contents
Step 1: Sign Up and Explore GetResponse
Embarking on your email marketing journey starts with a fundamental step: signing up for GetResponse. This platform has established itself as a powerhouse for marketers seeking to leverage email marketing to its fullest potential. Here’s how you can get started and what to explore once you’ve signed up, ensuring that you know how to use GetResponse for effective email marketing.
Signing Up for GetResponse
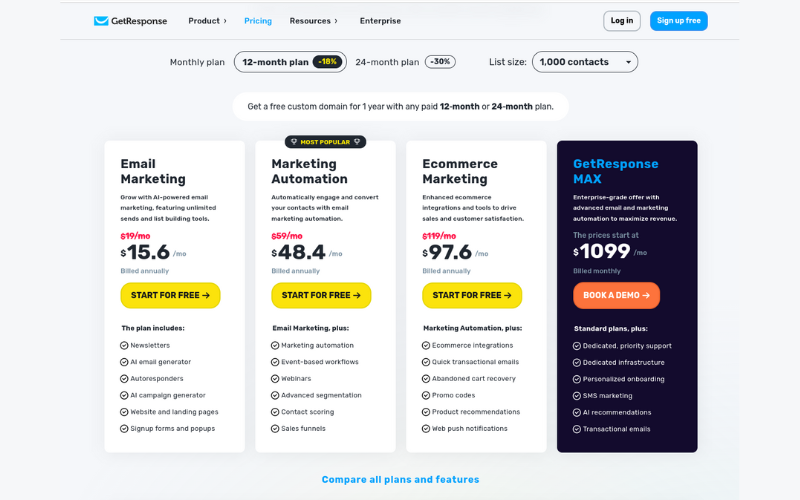
To sign up for GetResponse, visit their official website and choose the plan that best fits your marketing needs. GetResponse caters to a wide range of users, from beginners to advanced marketers, with plans varying in features from basic email campaigns to comprehensive marketing automation, webinars, and CRM functionalities.
- Select Your Plan: Evaluate the features each plan offers, such as the number of subscribers it supports, automation capabilities, and any additional tools like landing pages or webinar hosting. GetResponse offers a free trial, allowing you to test the platform before committing financially.
- Create Your Account: Sign up by providing your email address and creating a password. You’ll need to confirm your email address to activate your account fully.
- Set Up Your Account: Once logged in, you’ll be prompted to set up your account. This includes adding your business details and configuring basic settings. It’s a straightforward process designed to tailor the platform to your specific needs.
Exploring GetResponse
After signing up, take some time to explore GetResponse’s dashboard. It’s your command center for all email marketing activities. Here’s what to look for:
- Dashboard Overview: The dashboard gives you a quick snapshot of your email marketing performance, including recent campaigns, subscriber growth, and engagement metrics. It’s a great starting point each time you log in.
- Email Marketing Tools: Dive into the Email Marketing section to discover tools for creating newsletters, autoresponders, and automated workflows. Familiarize yourself with the template gallery and the drag-and-drop editor, both essential for crafting your emails.
- Contacts Management: The Contacts section is where you’ll manage your email list. Learn how to import existing contacts, create new segments, and utilize tags for better organization and targeting.
- Automation Features: Automation is a key feature of GetResponse, allowing you to create workflows that trigger emails based on specific actions or timings. Explore the automation templates to understand how you can automate welcome emails, follow-ups, and engagement campaigns.
- Landing Pages and Forms: Check out the tools for creating landing pages and sign-up forms. These are critical for growing your email list and converting visitors into subscribers.
- Analytics and Reporting: Lastly, the Analytics section is where you’ll track the success of your email campaigns. GetResponse provides detailed reports on opens, clicks, and conversions, helping you to refine your strategy over time.
Where to Add Images in GetResponse
Adding images can significantly enhance your blog post, making it more engaging and informative. Consider including images in the following sections:
- Screenshots of the Sign-Up Process: Help your readers by visually guiding them through the sign-up steps.
- Dashboard Overview: A screenshot of the GetResponse dashboard can give readers a sense of the platform’s interface.
- Email Editor: Images showing the template gallery or the drag-and-drop editor in action can illustrate how easy it is to create emails.
- Automation Workflows: A diagram or screenshot showcasing an example automation workflow can help readers understand the power of automation.
- Analytics Reports: A visual representation of the analytics dashboard can highlight the depth of insights available.
By incorporating these images, you’ll not only break up the text, making it easier to read, but also provide a richer, more helpful resource for your readers, showing them exactly how to use GetResponse for effective email marketing.
Step 2: Build and Segment Your Email List
A robust and well-segmented email list is the backbone of successful email marketing campaigns. Understanding how to use GetResponse for effective email marketing involves mastering the art of list building and segmentation. This step ensures that your messages are targeted, personalized, and relevant to each subscriber, significantly enhancing engagement and conversion rates.
Building Your Email List
The first step in your GetResponse journey is to build a list of subscribers who are interested in what you have to offer. Here’s how you can grow your list effectively:
- Use Sign-Up Forms: GetResponse offers a variety of customizable sign-up form templates that you can embed on your website. Ensure these forms are placed prominently on your homepage, blog, and landing pages to capture visitor information.
- Create Landing Pages: With GetResponse, you can design landing pages specifically for your marketing campaigns. These pages can offer downloadable content, free trials, or product demonstrations in exchange for visitors’ email addresses.
- Import Existing Contacts: If you already have a list of contacts, you can easily import them into GetResponse. Ensure you have permission to email these contacts and that they align with GDPR and other email marketing regulations.
Segmenting Your Email List
Once you’ve started to build your list, the next step is to segment it. Segmentation allows you to send more personalized and relevant emails to different groups within your list, based on their preferences, behaviors, and demographics. Here’s how to segment your list in GetResponse:
- Demographic Segmentation: Group your contacts based on demographic information such as age, gender, or location. This is particularly useful for tailoring your messaging and offers to fit the specific needs of each group.
- Behavioral Segmentation: Segment your list based on the actions subscribers take, such as opening certain emails, clicking on links, or making purchases. This allows you to craft follow-up messages that resonate with their interests.
- Engagement Segmentation: Identify which subscribers are most engaged with your emails and which are less active. You can create re-engagement campaigns targeting those who haven’t interacted with your emails in a while.
Where to Add Images
To make your blog post more engaging and informative, consider adding images in the following areas:
- Examples of Sign-Up Forms: Show readers what effective sign-up forms look like and where they can be placed on a website.
- Landing Page Designs: Include screenshots of high-converting landing pages created with GetResponse.
- Segmentation Interface: A visual guide to segmenting your email list in GetResponse can help readers understand the process better.
- Case Studies or Examples: If possible, include images from successful email campaigns that utilized list segmentation for better engagement and conversion.
Incorporating images related to list building and segmentation will not only enhance the visual appeal of your blog post but also provide practical examples to help readers grasp how to use GetResponse for effective email marketing. Visual aids can significantly improve comprehension and retention of information, making your guide a more valuable resource.

Step 3: Design Your First Email
Designing your first email is a pivotal step in leveraging GetResponse for effective email marketing. This process involves not just the aesthetic aspects but also structuring your content to engage and convert. With GetResponse’s intuitive tools and features, crafting your first email can be both straightforward and enjoyable.
Choose a Template
GetResponse offers a wide array of email templates suited for various purposes—from newsletters and promotions to event invitations and follow-ups. Start by choosing a template that aligns with your campaign’s goal. Look for a design that matches your brand’s aesthetics and message tone.
- Customization: Utilize the drag-and-drop editor to customize your chosen template. You can add your logo, images, and adjust colors to ensure the email reflects your brand identity.
- Content: Focus on your message’s clarity and conciseness. Your content should be engaging and provide value to your recipients. Include a compelling call-to-action (CTA) that guides subscribers on what to do next.
Personalization and Optimization
- Personalization: Use GetResponse’s personalization features to address subscribers by name or include other relevant details to make your emails feel more personalized and engaging.
- Mobile Optimization: Ensure your email design is responsive. With a significant portion of emails being opened on mobile devices, your design must look good and function well on smartphones and tablets.
Testing Before Sending
Before sending your email to your entire list, utilize GetResponse’s testing features to see how your email looks in different email clients and devices. This step is crucial to ensure that all elements display correctly and that your email is free from any technical issues.
Where to Add Images
Incorporating images within your blog post can greatly enhance understanding and engagement. Consider including images in these areas:
- Template Selection: Show a screenshot of the template gallery in GetResponse, highlighting the diversity of available designs.
- Editor in Action: Include a visual of the drag-and-drop editor with a template being customized. This can help readers visualize the customization process.
- Personalization Features: If possible, display an example of an email that uses personalization, such as including the recipient’s name in the greeting.
- Responsive Design: Offer a comparison image showing how an email adapts from desktop to mobile view, emphasizing the importance of mobile optimization.
These images will serve not only to break up the text, making your guide more readable, but also to provide practical, visual examples of how to design an effective email using GetResponse. This visual assistance can be invaluable for readers new to email marketing or those looking to improve their email design skills.
Step 4: Automate Your Email Campaigns
Automation is a key feature that sets GetResponse apart as a powerful tool for effective email marketing. By setting up automated email campaigns, you can deliver targeted messages to your subscribers at the perfect time without manual intervention, ensuring a personalized and timely communication strategy. Let’s dive into how you can automate your email campaigns using GetResponse.
Setting Up Automated Workflows
GetResponse’s automation workflows allow you to create a series of emails that are triggered by specific actions or behaviors from your subscribers. Here’s how to start:
- Identify Your Goals: Determine what you want to achieve with your automation. Common goals include welcoming new subscribers, nurturing leads, or re-engaging inactive users.
- Choose a Template or Create From Scratch: GetResponse offers pre-designed automation templates for common email sequences. Alternatively, you can build your own workflow from scratch using the drag-and-drop workflow builder.
- Define Triggers: Set up triggers based on subscriber actions, such as signing up for your list, clicking a link in an email, or making a purchase. These triggers will initiate your automated email sequence.
- Design Your Emails: Craft the content for each email in your sequence, ensuring it’s relevant to the trigger and your overall goal. Personalization and segmentation play a crucial role in making automated emails more effective.
Benefits of Email Automation
- Efficiency: Save time by automating repetitive tasks and focusing on strategy and content creation.
- Consistency: Maintain consistent communication with your subscribers, keeping your brand top-of-mind.
- Personalization: Deliver highly relevant and personalized content that resonates with each subscriber, increasing engagement and conversion rates.

To enhance your blog post and provide clear, visual guidance on setting up automated email campaigns in GetResponse, consider adding images in the following areas:
- Workflow Templates: Show a screenshot of the automation workflow templates available in GetResponse. This can help readers understand the starting points offered by the platform.
- Workflow Builder: Include an image of the drag-and-drop workflow builder in action, demonstrating how users can customize their automation sequences.
- Trigger Examples: Visual examples of different triggers and conditions can clarify how automation works and what possibilities exist for customization.
- Automated Email Examples: Display examples of automated emails from a sequence, highlighting the personalization and content strategies used.
Incorporating these images will not only make your guide more visually appealing but also help readers grasp the concept of automation in email marketing. Visual aids can simplify complex ideas, making it easier for your audience to understand how to use GetResponse to automate their email campaigns effectively.
Step 5: Test, Send, and Analyze
A crucial phase in utilizing GetResponse for effective email marketing involves testing your emails, sending them out to your list, and then analyzing the results to inform future campaigns. This iterative process ensures that your email marketing efforts are optimized for performance and engagement.
Testing Your Emails
Before launching your campaign, it’s essential to test your emails to avoid any potential issues that could affect their performance. GetResponse offers tools to help with this:
- Spam Test: Run a spam test to ensure your email doesn’t get flagged by email providers, which could hurt your deliverability rates.
- Email Preview: Use the email preview feature to see how your emails will look on different devices and email clients. This helps ensure your design and layout are responsive and appear as intended, regardless of where they’re viewed.
Sending Your Emails
With testing out of the way, you’re ready to send your emails. GetResponse simplifies this process, whether you’re sending a single email or an automated sequence.
- Scheduling: Decide whether to send your email immediately or schedule it for a later date and time. Timing can significantly impact your open rates, so consider when your audience is most likely to engage with your content.
Analyzing Your Campaigns
After sending your emails, the next step is to analyze their performance. This data is critical for understanding what’s working and what’s not.
- Open and Click-Through Rates (CTR): These basic metrics give you an insight into how engaging your email was to your audience.
- Conversion Rates: Track how many recipients took the desired action, such as making a purchase or signing up for a webinar.
- Bounce and Unsubscribe Rates: High rates here could indicate issues with your email list or content relevance.
Where to Add Images
To make your guide on testing, sending, and analyzing emails more engaging and informative, consider including images in the following sections:
- Email Preview Examples: Screenshots showing how the email preview tool works, displaying the same email across different devices and email clients.
- Spam Test Results: An example of spam test results can help readers understand what to look for and how to interpret these results.
- Analytics Dashboard: A snapshot of GetResponse’s analytics dashboard showcasing the various metrics available for tracking email performance.
- Scheduling Interface: Display the interface for scheduling emails to be sent later, highlighting how users can pick the date and time for their emails to go out.
Including these images will not only break up the text, making your post more readable, but also provide practical, visual examples that help readers understand how to effectively test, send, and analyze their email marketing campaigns using GetResponse. Visual aids can significantly enhance comprehension and application of the concepts discussed, making your guide a valuable resource for both new and experienced email marketers.
Step 6: Optimize for Better Results
Optimization is a continuous and critical process in using GetResponse for effective email marketing. It involves refining your strategies based on performance data to enhance the effectiveness of your future campaigns. Here’s how you can optimize your email marketing efforts for better results.
Analyze Campaign Data
Start by diving deep into the analytics provided by GetResponse. Look beyond basic metrics like open and click-through rates to understand the behavior of your audience.
- Segment Performance: Identify which segments of your audience are most engaged and tailor your content to suit their preferences.
- A/B Testing Results: Use the insights gained from A/B testing different elements of your emails, such as subject lines, email content, and send times, to inform your strategy.
Refine Your Email Content
Based on your analysis, make iterative changes to your email content and design.
- Personalization: Increase the level of personalization in your emails. This could mean more than just using the recipient’s name; consider personalizing content based on past interactions or preferences.
- Call-to-Action (CTA): Experiment with different CTAs to find out what drives higher conversion rates. This could involve changing the wording, placement, or design of your CTAs.
Enhance Email Deliverability
Ensuring your emails reach your subscribers’ inboxes is paramount.
- List Hygiene: Regularly clean your email list of inactive subscribers or invalid email addresses to improve your deliverability and engagement rates.
- Sender Reputation: Monitor your sender reputation by keeping an eye on bounce rates and spam complaints. Follow best practices to maintain a good sender reputation.
Implement Advanced Segmentation
As you gather more data, use it to create more advanced segmentation. Tailor your emails even more closely to different audience groups based on their behavior, preferences, and engagement levels.
Continuous Learning and Adaptation
Stay updated with the latest email marketing trends and features offered by GetResponse. Implement new techniques and tools as they become available to keep your campaigns fresh and engaging.
Where to Add Images
Incorporating images can significantly enhance the understanding and appeal of your content. Consider adding images in the following sections:
- Analytics and Segmentation: Screenshots showing how to analyze segment performance within GetResponse’s dashboard.
- A/B Testing Examples: Before and after images or side-by-side comparisons of different A/B tests conducted on email elements.
- Email Design Changes: Show a before-and-after view of an email that was optimized based on campaign data.
- Advanced Segmentation Interface: An image demonstrating how to set up advanced segmentation in GetResponse, highlighting the various criteria that can be used.
Including these images will not only make the guide more visually engaging but will also provide readers with clear, practical examples of how to optimize their email campaigns for better results. Visual aids are particularly effective in illustrating complex processes and can significantly improve the reader’s ability to apply the advice effectively.
Conclusion
Mastering GetResponse for effective email marketing is a journey that encompasses understanding the platform’s extensive features, from building and segmenting your email list to designing impactful emails, automating your campaigns, and rigorously testing and analyzing their performance. The process doesn’t stop here; optimization is an ongoing cycle of refining and improving your strategies based on actionable insights derived from your campaigns’ data.
In this guide, we’ve walked through the crucial steps to harness the power of GetResponse, aimed at not just reaching your audience but truly engaging them. Email marketing, with its unparalleled ROI potential, remains a cornerstone of digital marketing, and GetResponse offers a comprehensive toolkit to tap into this channel’s vast opportunities.
Remember, the key to email marketing success lies in continuous learning and adaptation. The digital landscape evolves, and so do the expectations of your audience. Stay abreast of the latest trends, experiment with new strategies, and leverage GetResponse’s evolving features to keep your email marketing efforts at the forefront of innovation.
As you implement these strategies, consider the power of visual content. Images such as screenshots of analytics dashboards, examples of email templates, and the GetResponse interface can significantly enhance your understanding and application of these concepts. They not only break up text to make the information more digestible but also provide clear, practical insights into the application of each strategy discussed.
Email marketing is not just about sending emails; it’s about creating meaningful connections, delivering value, and building lasting relationships with your audience. With GetResponse, you have everything you need to embark on this rewarding journey. Take the steps outlined in this guide, apply them diligently, and watch as your email marketing campaigns transform into powerful engines of growth for your business.
In conclusion, whether you’re just starting with GetResponse or looking to refine your existing email marketing efforts, the potential for impact is immense. By focusing on best practices, leveraging the platform’s robust features, and committing to ongoing optimization, you’re setting the stage for remarkable success. Happy emailing!


